Home    Deals    Projects    Recipes    Random   

Saturday, October 29, 2011

Super Girl Costume

Its a bird... Its a plane... No its Super Girl.
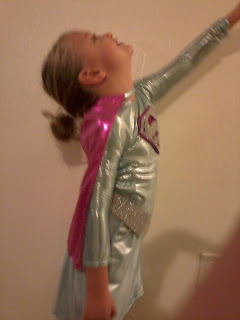
My four year old was determined to be a super hero this year.
However the costume she wanted was 20.00.
If I were spend that on all my girl's costumes I would have to spend 60 bucks for Halloween costumes... No way!!!
I made two costumes, a pink one for my 2 yr old and a blue one for my 4 year old. The cost of these costumes ended up being 8 dollars a costume.
This costume consists of the dress, the belt and the cape. I got the fabric at Jo Annes with coupons and the Halloween fabric half off sale.
I got one and a half yards of both fabrics at about 3.00 a yard. The silver foam paper was 1.50 a page but with a coupon it was 0.90 cents at Michaels. I got 2 pages. I got the pink sparkle foam in a pack at the dollar store. And it was 2 dollars for the thread. Thats a total of 16 dollars.
The back on my younger ones dress is just velcroed in the back.

The first thing I did was made the Super Girl symbol...
I printed the symbol from the web and than cut it out with an exacto knife (not a very good one). Than I just taped it to the back of the foam sparkly paper. Than I cut out the Super S around my homemade stencil. Than I cut out the pink diamond around it and stitched it together.
First I traced the shape of one of her long sleeve tops and skirts on to newspaper.
Word to the wise give yourself alot of extra fabric around the edge, Especially on the arms. I had to remake the arms because they were to small and my daughter couldn't get her arms through.
Than I did a zigzag stitch along the edges. And than sewed the pieces together. This fabric was very challenging and it took several hours for each costume. I don't think I will ever sew with this fabric again. Unpicking it is very difficult. The back was too small for my older daughter so I had to sew in a panel.
This fabric gets runs very easily. So when you see the start I just did the old nail polish trick and that seemed to do the trick.

For the cape I just cut out a rectangle and made a ribbon out of the blue fabric, by ironing it at the folds. I sewed velcro on the cape and the ribbon and used that to attach everything.
For the belt I just measured and marked the center of another sparkly paper (8x11) and cut it so the center was thicker than the edges. I made sure the thickness was the same on both sides.
Than I duct taped the back of the belt. (the foam tore on the first belt I made). Than I used the ribbon I made out of the fabric. I sewed it onto the belt and sewed velcro on the one side.
And there you have it two Super Girl costumes... From scratch. :)

Friday, October 14, 2011

Styrofoam Sword

Styrofoam Sword made from a swimming noodle.

On Guard!
These are so easy and one noodle can make about 10 swords. So its perfect for party favors, Halloween or whatever your little knight might need.I really recommend that you use the noodles shaped like these ones I have in the picture. They are kind of flower shaped.


First you just cut the noodle to the length you want your sword.

Than cut the sword piece off following the divisions already in the foam


Than take the other full piece and cut off about an inch and a half (depending on how many swords you want to make and how big you want the hilt of the sword).
It should look like a little flower. Make small slits on the inside so you can easily slide your sword into the hilt.


Connect the sword by putting long piece of the foam into the flower piece. You can than shape the sword by cutting off the excess and making a dull point on the end with scissors. I also used a lighter to burn away the excess flakes.


I used push pins for the gems. (Warning those did pop out so I would recommend using a glue gun).
I spray painted them and put glitter on the purple one while it was still wet. Warning: Valspar Finishing Touch made the foam sticky and never really dried, (now my hands are red). But the Valspar that was .96 cents at Walmart worked fine. Also the purple is Krylon brand and that worked the best. (Sorry, :{ I don't know how to stop it from automatically underlining everything).


Happy Dueling. :)

Sunday, October 2, 2011

DXG Video Camera Giveaway!

DXG-5C8VR Front

Two of a kind working on a full house is sponsoring a giving away for a DXG Video camera. They are super cute cameras and come with a matching case! Check it out!

My kids are constantly having Kandid Camera moments. And at the moment my phone camera seems to be my best choice for making videos. My last camera did not survive the several tragic accidents. It was eight years old any ways. So it did its time.
Any ways they have some that a super thin. Which is nice for storing, carrying, etc.

Check out the giveaway here.
You can also check out the specks of the the DXG Camera here.

.

Thursday, September 15, 2011

PVC Pixie Hut


Fairies are another favorite in my house. I wanted to make a little spot where my girls could read. Well it evolved into another little hut to play in. This is a Pixie Hut made out of PVC pipe and vinyl.

I painted on the inside of the vinyl and than mod podged the back so the paint wouldn't chip off.
The pipes are 3 different sizes that I picked up at Home Depot. The sizes were 1 1/4 inch, 1/2 inch. The small vines are just irrigation pipe. After I connected everything together I spray painted them. I used the connectors for the irrigation pipes to connect the smaller pieces. There are many different connectors you can use in the same place as the pipe.

This stuff doesn't bend or form easily. The best way is to heat it with a blow torch. I just used my creme brulee torch. I cut out vinyl in the shapes I wanted for the leaves and decor. I used a drill to make holes in the bottom so I could stick the 1/2 inch pipe into the 1 1/4 inch pipe.
And there you have it a homemade child size Pixie Hut.

Now with a little faith, trust, and pixie dust my little fairies are right at home.

Wednesday, September 14, 2011


New deals this week!!!

Toys R Us is cleaning house! They have many toys and school supplies on clear
ance. I got my daughter a backpack on sale for half off for 7.98. They also had the baby clothes on sale. They are buy one get one 50% off. Their flip flops are all on sale so when you buy two they end up being .75 cents each. They had tons of children's shoes; all kinds, dress shoes, sandals, tennis shoes, etc. So you could pick up shoes for very cheap less than $5 a pair. Its worth checking out.


Also Target has many things on sale too, mostly clothes and school supplies. I got a six pack of socks for my daughter. They were one sale for $2.24 and there was a peelie coupon $.50 off making it $1.76!
Also they had towel dresses for $2.25.

Walmart had many shoes on clearance. The prices ranged from $7.00 to $1.00.

Tuesday, September 13, 2011

Blues Clues Playhouse

Do you ever wonder how your child can watch one show over and over and over... etc again. That is how my kids are with Blues Clues. They love it. Every time I see a Blues Clues vhs at the thrift store I pick it up for them for their pure delight.
Cues Clues as my two year old calls it is their favorite past time. But no mom wants their child watching tv all day. So I made a Blues Clues playhouse. Now they play outside and get their wiggles out in their custom Blues Clues Playhouse.

I took plywood that I got cut at home depot and nailed it together with pieces of wood from their .50 cent pile.
All in all this project cost around 70 dollars.


First I painted it completely white and than spray painted the other colors I wanted over it. You can use your printables enlarged on publisher to the size you want and tape the back of them on where you want them. Than just spray paint over the paper and everything to leave a nice outline to make sure your characters are proportional. I bought the paint at Walmart and Micheals.

Then I painted on the Blues Clues theme. The characters are fairly easy to draw and I have a lot of practice since it is the most requested item on the doodle board :).

The secret to a project like this is patience and time. I free hand painted everything but if you're not confident in your artistic abilities you could just stencil it and than paint it.


The Nickelodeon website has tons of printables that you can use. Also if you want another theme Disney has several printables too. That make very fun projects for you and your child to play with, or you can use them for your inspiration.


I decided to paint the inside as well. This was my inspiration for the inside.


My girls love playing in it. So its been a huge success!

Thursday, September 8, 2011

Micheals Clearance SALE!!!


Micheals is having a great sale this week. They are clearing out their stock for Christmas. I found tons of party favors and monogramed decor and notepads. They also have their spa gifts and more on clearance. They are all 50 percent off when I went on Tuesday!

My daughters birthday is coming up so this was perfect timing. The party favors were only 50 cents each.

Happy Shopping.

Thursday, September 1, 2011

Couponing Tips: Where has all the ink gone?


So the thing to do right now is couponing. In my opinion it is a fad brought on by necessity. I have gone through the obsessive extreme faze and am now enjoying the realistic faze.

One of the things I struggled with in the beginning was ink was getting expensive when it came to the printable coupons.

I would print several coupons I thought I needed and than low and behold I would ended wasting ink and paper. It started to get pretty pricey... So I waited for a major sale and bought a Brother black and white laser printer. (about $85) Than I spent 20 dollars to buy four refills of toner (Amazon). I have only had to refill my printer once and it has been almost 2 years.

:> Woohoo!!!

There are many tutorials on youtube about how to refill your ink or toner. Just look up your printer including the model number and amazon offers kits and ink for everything!

Oh but unfortunately, the worst.... let me emphasize WORST! (from experience) printer to refill is an Epson. Steer clear if you can.

To keep paper cheap... just coupon. Staples, Office Max and Office Depot all have sales where you can get printer paper for a dollar or less. Right now Staples has 50 cent deal going on.

Oh and wear gloves!!! And... (and is such a handy word) they fit perfectly in a wipes container.

Monday, July 18, 2011

Minnie Mouse Cake


This was what I made for my daughters first birthday. My girls love Minnie Mouse. I was able to make everything with what I had in the kitchen. I used marshmallow fondant (so much better than the store bought stuff!) that I made in my kitchen aid. And butter cream frosting. It was a lot of work but turned out beautiful.

My daughters helped stamp out the polka dots. So it was a fun activity for everyone.

The ears are actually brown. I thought it beat making a trip to the craft store. I just mixed all the colors in equal portions to make the brown. After adding a lot of food coloring. I ended up having to add more and more and more powder sugar to change it back to fondant from sticky brown goo. In the end I wished I would have just gone to the craft store.

The pink is a neon pink. It came in a kit from the grocery store. It was located next to the primary colors.

*****Gloves are a must when mixing your own fondant and food coloring!*****

Big Boxes are Better than Toys!!!

Cardboard Playhouse

I made this for my girls. We got a new washing machine and it came with a gigantic fun box.
I am sure you have all heard the familiar saying that kids have more fun with the box than the toy that came in it.

But nobody wants an ugly box hanging around. So I covered it in left over wrapping paper from Christmas and a couple of dollar store rolls of paper for the yellow and the polka dot front and door.Than I modpodged it on. And there you go, a fun little playhouse for minimal cost. I took empty toilet paper rolls and wrapped them. The girls used those a spy holes and also had fun talking in them.

I took the top of box and pulled up the top sides into an angle and than I took the bottom of the box and used it as the roof. I connected it with clear packing tape.

For the edging to hide where the wrapping paper meets I lined it with ribbon.

The wrapping paper was bought half off at hobby lobby during Christmas time. It is awesome wrapping paper, very durable. I bought the modpodge with a 40% off coupon from Micheals. And the flower and sign came from the dollar store too. In all I think this project cost around 10 dollars. It took a few hours and the kids loved it.

This is a project your kids can help with. They can help modpodge. And they can color on the wrapping paper and inside of the box after it is finished. Super fun!

Note: If it starts coming apart I just slapped on a piece of boxing tape and it was a quick easy fix. I also found to make it last longer I lined the openings like the windows and doors with packing tape for more durability.